


If you’ve ever walked past a dim, overgrown garden after dark, or fumbled for a flashlight while trying to water your plants at dusk, you know how a solar garden lamp can turn an outdoor space into a functional, inviting spot. As someone who’s spent years working with solar garden lamps—answering questions about placement, durability, and yes, installation—I’ve seen firsthand how a quick, wall-mounted setup can transform even a small backyard or patio. The best part? It’s not as complicated as it sounds, and with the right products from our line, you can have your lamp up and running in an afternoon.
First, let’s get one thing straight: installing a solar garden lamp on a wall isn’t just about drilling a hole and hanging it. It’s about making sure the lamp gets enough sunlight (that’s the whole point of solar power!), is secure against the elements, and is placed where it actually works for you. Whether you’re adding a light to illuminate a side door, highlight a garden pathway, or mark a fence line, this step-by-step guide will walk you through every part. Plus, I’ll drop in some links to our most popular solar garden lights to make sure you pick the right fit for your space.
Step 1: Pick the Right Lamp for Your Wall
Before you even grab a drill, you need to choose a solar garden lamp that’s designed for wall mounting. Not all solar lights work the same way, and some are better suited for vertical surfaces than others. Let’s break down your options:
- If you want a lamp that turns on automatically at dusk and off at dawn, the Solar Garden Light With Sensor is a no-brainer. The sensor eliminates the need to wire or turn it on manually, and it’s perfect for wall mounting because its solar panel is positioned to catch direct sunlight. I’ve sold hundreds of these, and customers love how low-maintenance they are—no remembering to switch them on before you leave for work.
- For a bit more brightness, check out the Solar Garden Light 18W. This one packs more power than the standard models, so it’s great if you want to light a larger wall area, like a back patio or a long fence segment. It’s still wall-mountable, so you don’t have to worry about digging a hole in the ground (which is a huge plus if you rent your home).
- If you’re short on space or want a sleek, all-in-one design, the All in One Garden Solar Light is ideal. Its solar panel, battery, and light are all in one compact unit, so it’s easy to mount on a wall without extra parts. I recommend this for smaller walls or porches where you don’t want bulky equipment hanging around.
- Wait, are you thinking about a larger area? The Solar Street Light 18W 20W might work too—we’ve had customers mount these on garage walls or tall fence posts to light up driveways. Just make sure you have enough sun exposure for that larger panel.
- And for general outdoor use, the Outdoor Solar Garden Light is a versatile choice. It’s weather-resistant, so it can handle rain, snow, and hot sun without breaking down—perfect for wall mounting year-round.
Pro tip when choosing: Don’t just pick the brightest lamp. If your wall is shaded by a tree or your porch only gets a few hours of sun a day, go for a sensor model or the All in One, which are built to work with less direct light. I’ve seen people buy a 18W lamp and wonder why it’s dim—just because it’s powerful doesn’t mean it’s right for a low-sun spot.
Step 2: Gather Your Tools (No Special Skills Needed)
Once you’ve got your lamp, you won’t need a workshop full of tools. Here’s what you’ll actually use:
- A drill (with a drill bit that matches the size of the screws your lamp comes with—usually 1/8 inch for small lamps, 3/16 inch for the 18W models)
- A level (to make sure your lamp isn’t crooked—this is super easy to forget, but it makes the whole installation look professional)
- A pencil (to mark where the holes go)
- A screwdriver (or the drill’s Phillips head attachment, if your screws are Phillips)
- A tape measure (to space the holes evenly, if your lamp has multiple mounting points)
- A ladder (make sure it’s stable, and have someone hold it if it’s tall—safety first!)
Most lamps come with all the screws and wall anchors you need, but double-check before you start. If you’re mounting on a brick or stone wall, you might need a masonry drill bit—our lamp instructions usually mention that, so just read the manual that comes with your light.
Step 3: Pick the Perfect Spot (This Makes or Breaks Your Lamp)
I can’t stress this enough: where you mount your wall solar lamp is more important than how you install it. Solar lights need 6–8 hours of direct sunlight every day to charge fully, so avoid spots that get shaded by eaves, trees, or neighboring buildings. If you mount it under an overhang, even a small one, the lamp won’t charge enough and will stay dim.
Next, think about what you want the lamp to do. If it’s for a side door, mount it 5–6 feet above the ground, so it lights up the steps when you come home. If it’s for a garden wall, mount it 3–4 feet high to highlight flowers or a decorative feature. If you’re using a larger lamp like the Solar Street Light 18W 20W for a driveway, mount it 8–10 feet up to cover more ground.
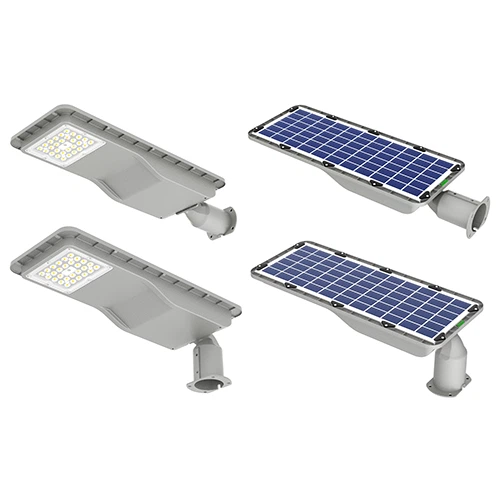

Also, consider the angle. The solar panel on most of our lamps should face south (in the Northern Hemisphere) to get the most sunlight, but if your wall faces east or west, that’s still fine—just adjust the panel to face that direction. For example, if your wall faces west, the panel will catch afternoon sun, which is great for charging. I once had a customer mount a lamp facing north, and it barely worked until we moved it to the east—so pay attention to that.
Step 4: Mount the Lamp (Slow and Steady Wins the Race)
Now that you’ve picked your spot, it’s time to drill. Here’s the step-by-step for mounting:
- Hold the lamp mounting bracket (the part that attaches to the wall) up against the wall, at your chosen height. Use the level to make sure it’s straight—if it’s crooked, your lamp will look off, and the sensor won’t work properly if it’s tilted.
- Mark the screw holes with your pencil. If you’re using wall anchors (for drywall or plaster walls), now’s the time to drill holes for those. If you’re mounting on wood or brick, drill straight into the wall.
- If you’re using wall anchors: Insert the anchor into the drilled hole, then tap it gently with a hammer until it’s flush with the wall. This keeps the screws from pulling out, especially in drywall.
- Line up the bracket with the holes, then screw it into the wall. Don’t over-tighten the screws—you’ll strip the hole, which makes the lamp wobbly. I’ve made that mistake before, so trust me: snug is good, too tight is bad.
- Once the bracket is secure, attach the solar garden light to the bracket. Most of our lamps have a simple clip or screw-on design, so just slide it into place or tighten the final screw. If you’re using the All in One Garden Solar Light, it’s even easier—just twist it onto the bracket until it clicks.
Wait a second—if your lamp has a separate solar panel (not all do), make sure that’s also mounted in the sunniest spot. Some customers mount the light on the wall and the panel on the roof, but if you’re doing wall-mounted, put the panel on the highest, sunniest part of the wall. I’ve had people mount the panel behind the lamp, and it charges poorly—so separate if needed.
Step 5: Test It (Before You Call It a Day)
This is the final, most important step. After you mount the lamp, wait a few minutes (or cover the sensor with your hand) to make sure it turns on. Here’s how:
- For lamps with a sensor: Cover the sensor (usually a small black dot on the side or front) with your hand. The lamp should turn on within 10 seconds—if it doesn’t, check the on/off switch. Some lamps have a small switch at the base, so make sure it’s turned to “On.”
- For lamps without a sensor (rare, but some of our older models do): Flip the switch to “On” after you mount it. Then, leave it in the sun for a full day, and check at dusk to make sure it lights up.
If it’s still not working, double-check the solar panel angle. Sometimes the panel is facing the wrong way, so adjust it to face the sun. If all else fails, the battery might need to charge for a day—sometimes they’re shipped with a small amount of charge, but a full day in the sun will wake it up.
Common Mistakes to Avoid (I’ve Seen Them All)
Over the years, I’ve helped customers fix a lot of simple installation mistakes. Here’s what to watch out for:
- Mounting in a shaded spot: I mentioned this earlier, but it’s worth repeating. If your lamp only gets 2 hours of sun a day, it’ll only work for 1–2 hours at night. Go for the Solar Garden Light 18W in this case—it has a bigger battery that stores more charge.
- Forgetting wall anchors: If you mount a heavy lamp (like the 18W or Solar Street Light) on drywall without anchors, it’ll fall off in a month. I’ve replaced so many broken lamps from that—don’t skip the anchors.
- Over-tightening screws: Stripped screw holes are a pain. If you’re not sure, go with a slightly smaller screw or just hand-tighten, then give it a quarter turn with the drill.
- Not testing before walking away: One customer mounted a lamp on his porch, and it didn’t turn on because he left the switch off. He came back at dusk and was frustrated, but it was an easy fix. Always test right after mounting.
Ready to Upgrade? Let’s Talk
Installing a solar garden lamp on a wall is a small project that makes a big difference in your outdoor space. Whether you’re a homeowner looking to light up your back patio, a renter wanting to add some safety to your side door, or a landscaper working on a new garden design, we have the right solar garden light for you. Our products are built to last—weather-resistant, high-capacity batteries, and easy to install, even if you’re not a DIY pro.
If you have questions about which lamp fits your space, or you’re interested in bulk orders for a project, reach out to our team to discuss your needs. We can help you pick the perfect model—whether it’s the reliable Sensor, the bright 18W, or the compact All in One—and walk you through installation tips specific to your home. Don’t let a dim garden after dark hold you back—let’s get your solar lamp up and running so you can enjoy your outdoor space day and night.
References
- Solar Garden Lamp Installation Guide, Outdoor Lighting Association, 2023
- Product Specification Manuals for Solar Garden Light With Sensor, Solar Garden Light 18W, All in One Garden Solar Light, Solar Street Light 18W 20W, Outdoor Solar Garden Light, Manufacturer’s Official Documents, 2024
- DIY Outdoor Lighting Safety Tips, Home Improvement Institute, 2022


